I am setting up Keycloak for a pet project and for automation purposes I wanted to use their Admin REST API. It took me a bit of time to find out how to get the token for authorization and then I was surprised that Postman does not offer an off-the-shelf auto-refresh solution. As Keycloak tokens expire after 1 min, I realized I had to find a solution for testing.
After digging a bit I found that this could be solved easily with Pre-request scripts. Postman gives the option to execute Javascript pre- and post-request and using javascript it is possible to call the authorization endpoint and save the token.
In my example, I am applying the script for a folder, meaning that every request in that folder will execute it when required (sidenote: make sure you save your folder before you try! I spent quite some time debugging why it doesn’t work when it just wasn’t saved).
Preparation
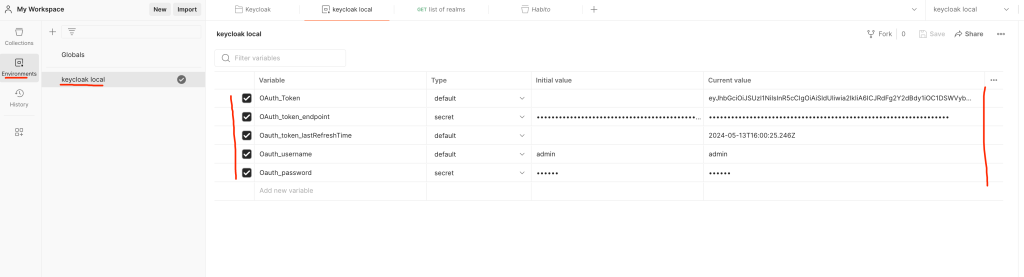
The only thing you need to prepare is an environment in Postman and define five variables in it
OAuth_Token
No need to define. Will store the actual token which will be referred to during authorization.
OAuth_token_endpoint
The endpoint where the token is refreshed.
Oauth_token_lastRefreshTime
Timestamp of when the token was last refreshed.
Oauth_username
In my example, I needed a username and password to get the token and for best practice, I stored them as environment variables.
Oauth_password
Environment variables and their description
How-to
Setup auto-refresh
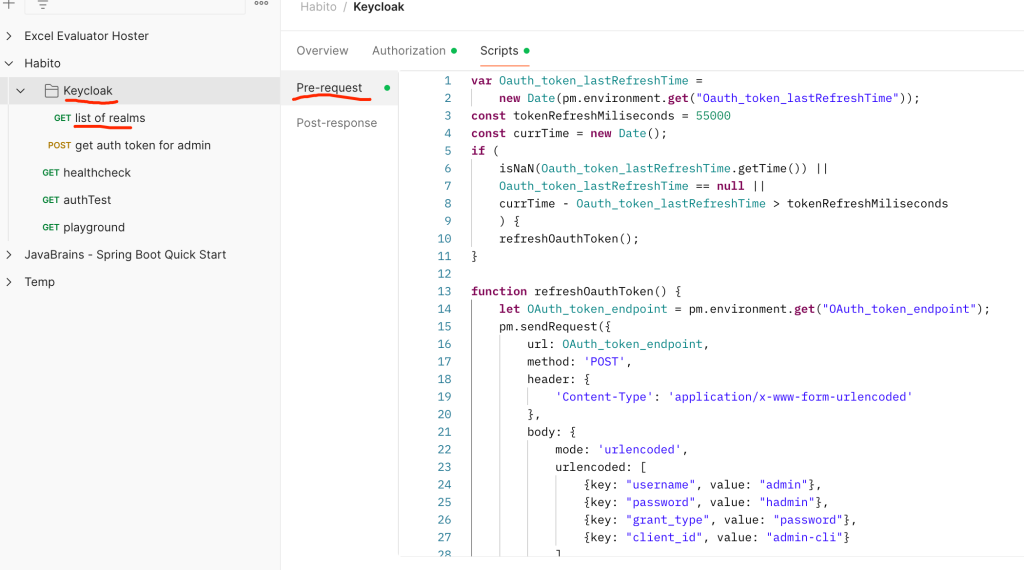
I have a folder called Keycloak (of course, in your example you can have any folder) and inside that folder I have a request called list-of realms. In the Pre-request part, add the following Javascript code:
var Oauth_token_lastRefreshTime =
    new Date(pm.environment.get("Oauth_token_lastRefreshTime"));
const tokenRefreshMiliseconds = 55000
const currTime = new Date();
if (
    isNaN(Oauth_token_lastRefreshTime.getTime()) ||
    Oauth_token_lastRefreshTime == null ||
    currTime - Oauth_token_lastRefreshTime > tokenRefreshMiliseconds
    ) {
    refreshOauthToken();
}

function refreshOauthToken() {
    let OAuth_token_endpoint = pm.environment.get("OAuth_token_endpoint");
    let Oauth_username = pm.environment.get("Oauth_username");
    let Oauth_password = pm.environment.get("Oauth_password");
    pm.sendRequest({
        url: OAuth_token_endpoint,
        method: 'POST',
        header: {
            'Content-Type': 'application/x-www-form-urlencoded'
        },
        body: {
            mode: 'urlencoded',
            urlencoded: [
                {key: "username", value: Oauth_username},
                {key: "password", value: Oauth_password},
                {key: "grant_type", value: "password"},
                {key: "client_id", value: "admin-cli"}
            ]
        }
    }, function (err, res) {
        if (err) {
            console.log(err);
        } else {
            pm.environment.set("OAuth_Token", res.json().access_token);
            pm.environment.set("Oauth_token_lastRefreshTime",currTime);
        }
    });
}
This code
gets the last time of refresh from env. variable
if it’s empty, not a date, or older than 55.000 ms (55 sec), it refreshes the token
gets the endpoint from env. variable
calls the auth endpoint with the required headers and the body
saves the token to an env. variable
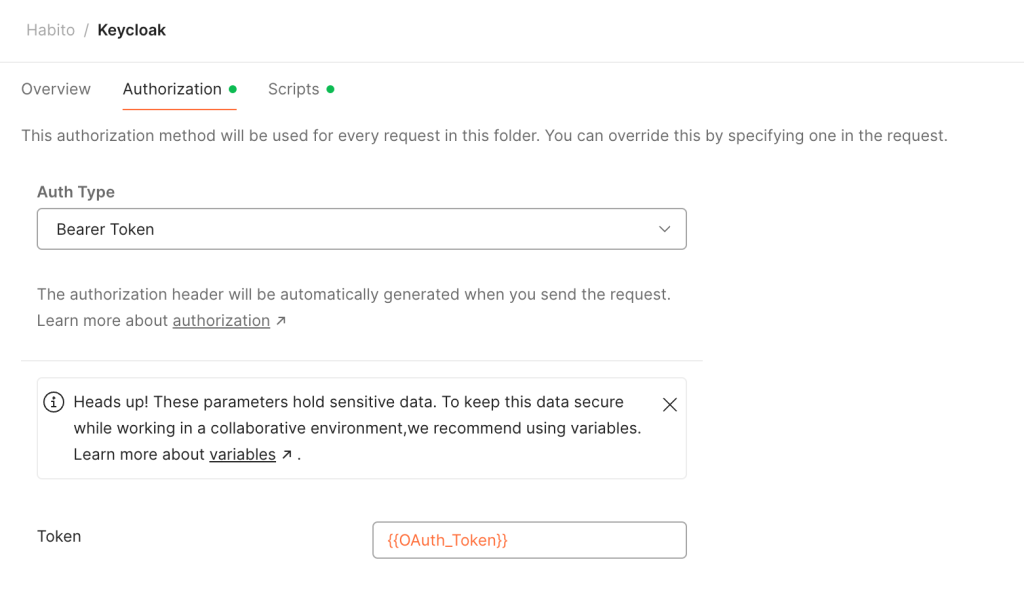
Setup authorization
This is quite simple, select the Bearer token, and for the token itself, refer to the environment variable as {{OAuth_Token}}. Keep in mind, that if you are doing how I did it (defining it on the folder level), then in the request itself you need to define authorization as “inherit Auth from parent“.
How to test
In the console (bottom-left in Postman) you can see the outgoing requests. I called the /realms endpoint twice: the first time it triggered the token refresh before the call itself, and the second time it didn’t refresh it at all. If it doesn’t work for any reason, you can use the arrow to open the request for more details.
The biggest help that I got from my company is that they helped me identify a pet project which is small enough to make sense, but complex enough to help me learn. In general, it uploads, exposes some files, and later modifies them via an open-source library. This enables me to learn in a way that I know what I want to build and I learn what I need for the next chapter. I will share here where the guides that helped me a lot.
It took me some time to understand that I don’t actually need to write the queries myself but JPA will take care of it and I only have to care for the data model (this is simplification, for sure). My thinking before was that it must work in a way that I have to construct the query as any spring (like “select version from excel_file where uuid=\”” + result.uuid + “\;”).
To make this work, I had to figure out how to host a MySQL server using docker. Here, ChatGPT and some googling walked me through and now I am a happy user of that database.
Right now, my structure is very simple, it is only one tab, but it does do the job:
I learned here about Thymeleaf and controllers how to create a simple form, and how to connect it to a template and access it from the browser. The pet project I am working on is more backend-facing and the UI is only the backup, I did not focus too much on this, I built a generic template with error handling. It was still useful to understand how these are connected conceptually.